Writing a Low-Level Sound System — You Can Do It!
In this post, I’ll take a look at what it takes to write a low-level sound system. I.e., one where you do all the sampling, mixing, effects, etc by yourself. Though this may seem like a daunting task it is in fact pretty straightforward, depending on what features you want to add.
Why?
Why would you want to do this? Well, if you have been following the Our Machinery blog for a while you know that we like to have control of as much as the tech stack as possible. It is nice to be able to step into and debug anything, to have full control of performance and be able to implement whatever crazy algorithms we can think of. But there are other reasons too.
If the only thing we offered in The Machinery was bindings to a high-level sound system, such as FMOD, Wwise or Elias we would force anyone who wanted to play sounds in The Machinery to license that software. No doubt, these are good products that have been used successfully in a lot of different games, but that doesn’t mean that licensing them is the right choice for all of our users.
The Machinery is a flexible game engine platform with many different potential uses: it can be used to build games, but also other kinds of interactive experiences, visualizations, simulations, tools, and applications. For some of our users, licensing a sound system will be the right choice, but a lot of others will probably just want to play a few sounds, and we don’t want to force those users to pay additional license fees. So we need a built-in sound system that works everywhere without any need to buy additional software.
Note that this doesn’t mean that we will never provide bindings to any commercial high-level sound system. On the contrary, we probably will. That way, our users can make an informed choice between licensing that or using our built-in sound system.
Once we’ve figured out that we need to build our own sound system, the next question is how to do it. One option would be to build on top of an existing audio library such as OpenAL, XAudio2, etc. The advantage of this is that these libraries provide a lot of the functionality we need “for free”.
The disadvantage is that we don’t have full control of the implementation and that we might have to use different libraries on different platforms. For example, on Windows and Xbox, it would make sense to use XAudio2, but that’s not available on iOS, Android, OS X or Sony.
In the Bitsquid/Stingray engine, we had a single high-level sound API built on top of different platform-specific backends, just as you would build an abstract rendering API on top of Vulkan, Metal, DirectX12, etc. On Windows, we used XAudio2, on OS X OpenAL on OS X, on Android OpenSL, etc.
This turned out to be a pretty horrible approach. We were forced to deal with all the bugs and quirks of all the different backends. Since they are all implemented differently it’s really tricky to get a game to sound exactly the same on all the different platforms. Also, the feature set of each library is slightly different, which means the abstraction is forced to code to the lowest common denominator.
In the end, I spent so much time learning about and dealing with all these different sound libraries that I swore it would have been easier just to do everything myself.
The cost/benefit equation has also changed in recent years. When OpenAL was introduced in 2000, the big impetus was to take advantage of the hardware mixing capabilities of sound cards. Just as OpenGL is a common API for talking to various GPUs, OpenAL was meant to be a common API for talking to various sound cards. However, these days, CPUs are a lot faster and computers have a lot more cores. Sound mixing isn’t that expensive — there is very little reason to not just do it in software. And if you want to play a really large number of sounds, you are more likely to be limited by memory bandwidth than CPU.
One other option, instead of writing everything from scratch, would be to start with an open-source cross-platform library such as OpenAL Soft. This would get us up and running faster while still having code that works cross-platform, can be debugged, changed, etc. This wasn’t the right approach for us, for two reasons. First, OpenAL Soft is LGPL, which we don’t want in our engine. Second, we feel that the OpenAL Soft API is hamstrung by being designed as an API for interacting with hardware. For example, a lot of the functionality is provided as extensions. This makes sense for a hardware platform where you need to be able to query for what the hardware supports, but it is a bit clumsy for a software platform that will always support everything.
Since we will be doing all the mixing computations ourselves, all we need from the system is a way to output our final mixed streams to the system speakers. More about that later.
Introduction to audio
To understand how to implement your own sound mixer you first need a little bit of understanding about what sound is. I won’t go into too much detail here, just give a quick introduction.
Essentially, sound is an air pressure wave. In the “real world” these pressure waves can travel in all directions which is complicated to model, but for audio playback, we don’t really have to worry about that. We only have to care about pressure waves produced by speakers. A speaker has a cone that can move in and out to produce sound waves. We can represent the cone’s position over time with a simple graph:
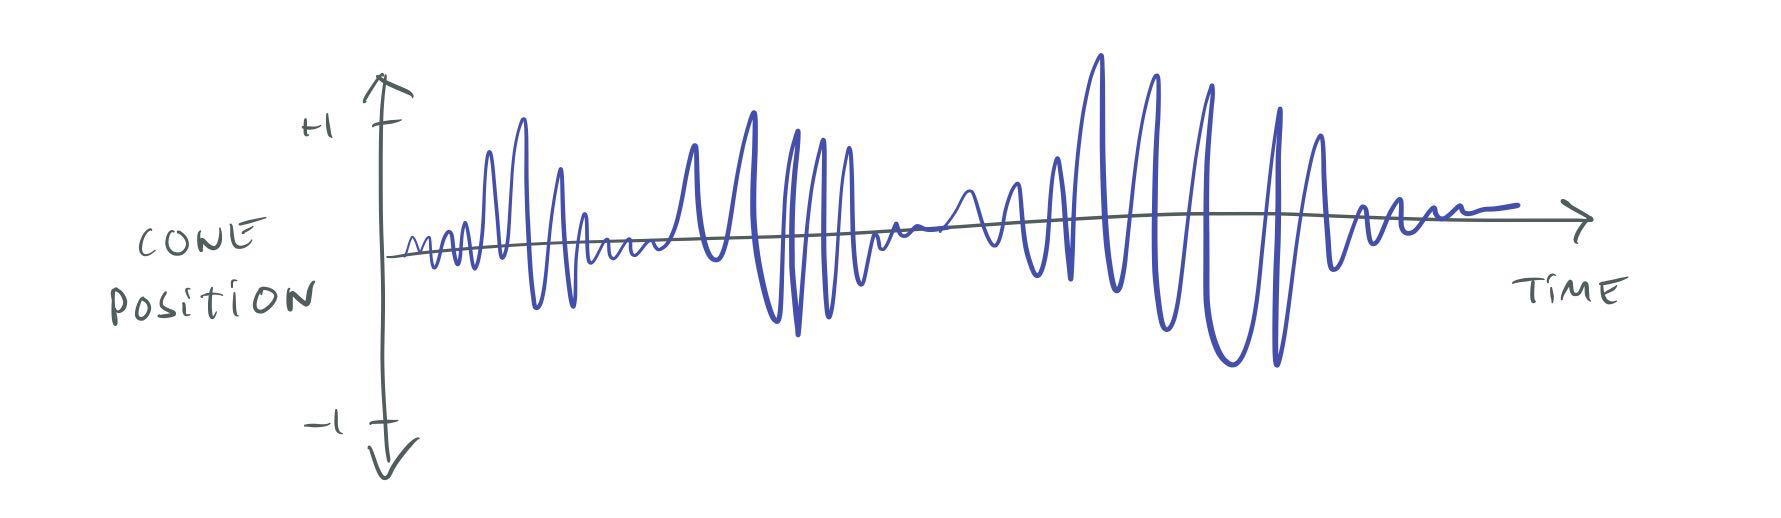
Cone position of a speaker over time.
I’ve normalized this graph so that +1 represents the furthest out the speaker can move and -1 the furthest in. This is how “sound waves” are normally represented, and this is what you will see if you open an audio file in a program such as Audacity.
Note that in the “real world”, the air pressure can be arbitrarily large — for example, the air pressure wave from a bomb can level buildings — but a speaker always has a maximum extent that the cone can move, so there is always a maximum volume. We typically call this maximum volume 0 dB. Volumes lower than the maximum are represented by negative decibels: -10 dB, -20 dB, etc.
This may seem confusing. Why don’t we just let “no sound” be 0 dB and then the volume would go up from there: 10 dB, 20 dB, etc? Well, since the decibel scale is logarithmic, “no sound” would actually be -∞ dB, so that doesn’t work. The dB scale is always relative to some reference point. When people say things like “an airplane engine is 150 dB” that is relative to a reference point where 0 dB represents the threshold of human hearing. That reference point doesn’t make much sense for a speaker though, since it depends on the power of the speaker, how far away the listener is, etc. Using the maximum volume of the speaker as our 0 dB reference point works better.
A tone can be represented as a sine wave of a specific frequency. For example, A above middle C is represented as by a 440 Hz sine wave:
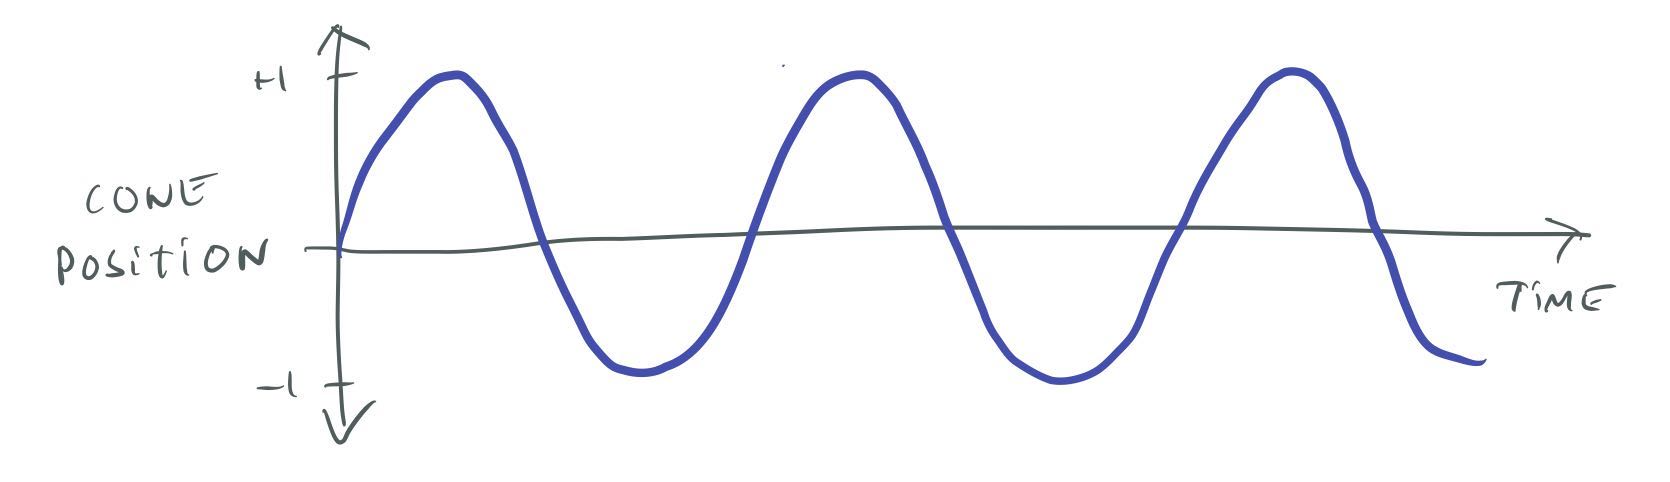
440 Hz sine wave.
Note that the wave doesn’t actually have to be sine shaped, a sawtooth-shaped or a square-shaped wave with the same frequency will still produce the same note, but with slightly different characteristics (overtones).
In a system with more than one speaker, we can send a different sound wave to each speaker. This can be used to produce stereo effects. For example, if we play a guitar sound at a higher volume in the right ear than in the left ear, the sound will be perceived as coming from the right of the listener.
Now that we know a little bit about how sound works, we can think about how to represent it in a computer. Computers work with digital information so instead of a continuous curve, we represent the sound wave by samples taken at discrete points in time. We call the number of samples we take per second the sample rate. The higher the sample rate is, the more accurately we can represent the analog sound curve. The drawback is that we need more memory to hold all the sample data:
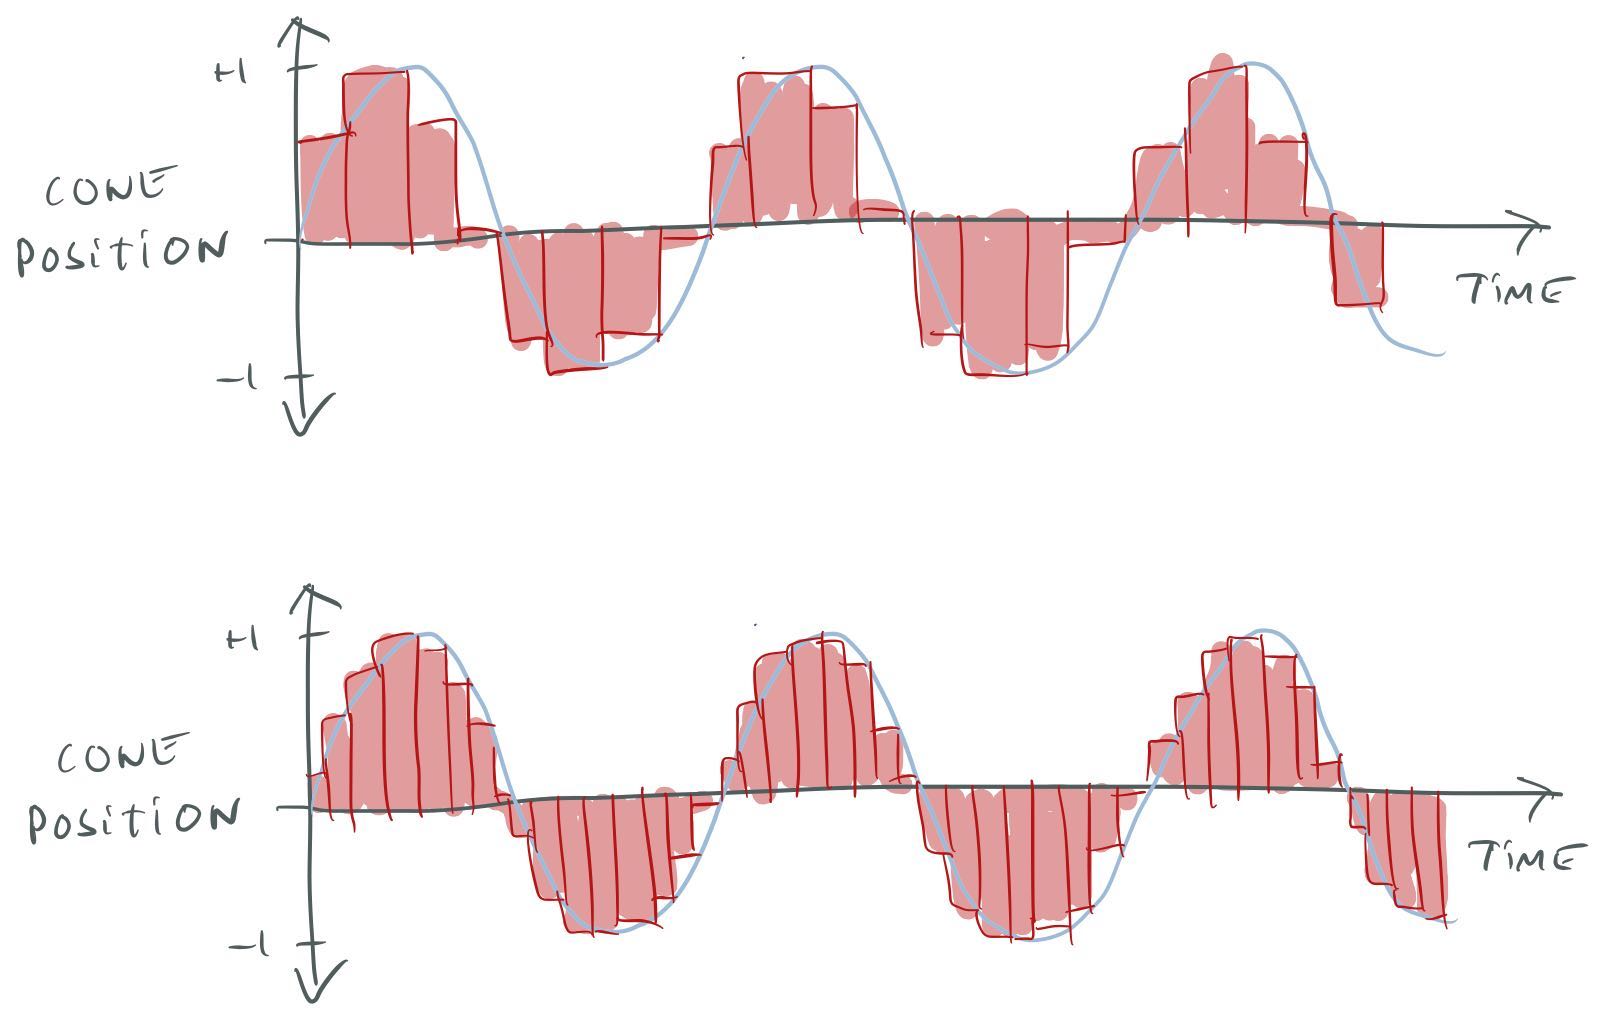
Sampling a sound wave at two different sample rates.
CDs use a sample rate of 44.1 kHz, while DVD-video uses 48 kHz. Higher sample rates are possible, for example, DVD-audio can use 96 kHz. Whether you can actually hear any difference between 48 and 96 kHz depends on how much gold plating you have put on your speaker cables.
In addition to the sample rate, to digitize the sound we also need to decide how many bits to use to represent each sample in the (-1 … 1) range. Again, the more bits we use, the more accurately we can represent the curve. CDs use 16 bits, DVD-audio uses 24 bits.
Sound files (WAV, AIFF, etc) can have different sample rates and bit rates. It ends up being a trade-off between quality and memory use. For example, when uncompressed, a 44.1 kHz file will use twice the memory of a 22.05 kHz one. Lossy compression formats such as MP3, M4A, or Vorbis can significantly reduce the memory use at the cost of some quality and the CPU time needed to decompress.
Sound files can also be mono, stereo or multichannel (for example, have separate tracks for each speaker in a 5.1 or 7.1 system).
System overview
Now that we know a little bit more about how sound works we can start to think about what our system should do. We want it to manage a number of playing sounds and mix together their sound waves to produce output for the speakers:
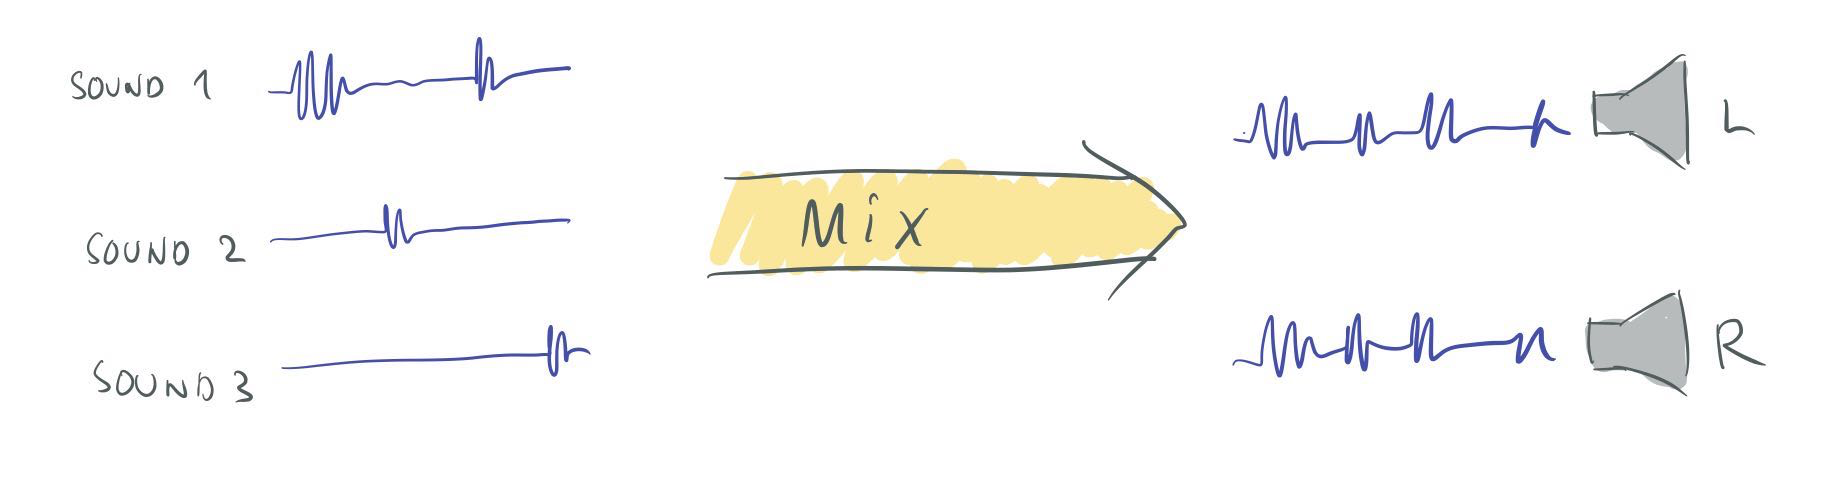
Basic operation of the mixer.
Thinking about it in a bit more detail, we probably want the system to work on a fixed number of N samples at a time. The system should get the next N samples from each of the playing sounds, and determine how much of that sound should be sent to each speaker. Then add all the sounds for each speaker together and send that to our speaker output backend.
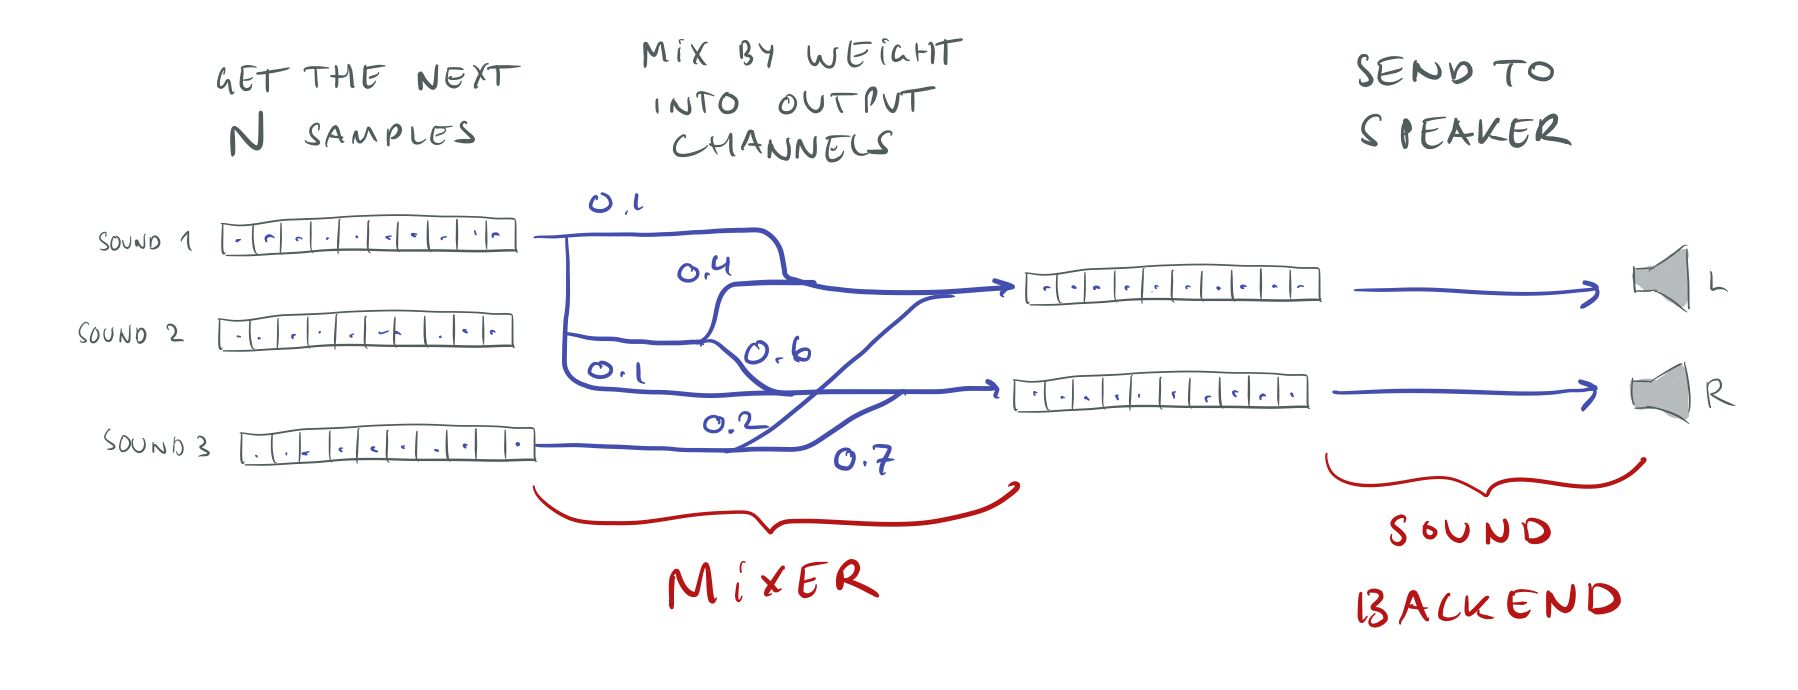
Mixing samples.
Note that the playing sounds might all have different sample rates and bit rates, but we want the mixer to work at a single fixed sample and bit rate so that we can just add everything together without worrying about conversions. We’ll convert the playing sounds to this sample rate when we get the samples from them, and we will convert from the mixer format to whatever format the speakers want just before sound output.
For the internal mixer format, I’m using a 44.1 kHz sample rate and 32-bit floats to represent each sample. 44.1 kHz gives us CD quality and allows us to upsample easily from 22 kHz and 11 kHz which are common WAV file sample rates. 32-bit floats have 23 bits of mantissa, so the quality is similar to what you would get with 24-bit integers, but floats have the advantage of being able to represent numbers outside the [-1, 1] range. If you add two full volume [-1, 1] sounds, the result will be in the [-2, 2] range. There is no way of representing this using 24-bit fixed-point numbers. Thus, if you are using fixed-point for your mixing, you have to be really careful about overflows.
Implementation strategy
Whenever I implement a new feature, a new system, or anything really — I always try to break it up into incremental steps that are as small as possible. I find it pretty hard to visualize how to go from nothing to a big system with all the bells and whistles that we want. But it is pretty easy to visualize how to take one step in the right direction. And after writing software for many many years, I have developed the trust that if I keep walking, one step in the right direction, one step at a time, I will eventually arrive at the destination. I’ve come to realize that this trust is something very valuable. Since I don’t have to worry or fret too much, I can stay productive and focused.
In fact, I think this approach of taking small steps in the right direction and trust that it will lead you right in the end, is the best way to tackle any problem in life, whether it’s about your career, your health, or a skill that you want to acquire.
I’m also a big believer in push-early, push-often and trunk-based development, so I make sure that after each step I have code that can be pushed to our source repository and improve the engine in some small way. That way, even if I have to take a break to go work on a more pressing issue (which happens all the time) I will still have delivered some value. It is not just two months of work with nothing to show for it. Plus, sharing my work with others makes it a lot easier to see if things are going the right way or if something needs to be changed.
For some very hairy problems, it might be necessary to “go into a cave” to figure them out. But in most cases, I think you are much better off doing incremental updates and sharing your progress with your colleagues.
For the sound system, the first thing I did was to make sure that I could get some sound — any sound — out of the speakers. Just as when you are doing graphics coding — things get a lot easier once you have your first triangle on-screen. When you don’t have any feedback at all, you can’t tell if you’re breaking things and it’s easy to get into the weeds.
To test the output, I wrote some code to generate a sine wave into a buffer and made sure I could play that through the speakers, then pushed that code — one little step taken. After that, I wrote the code for parsing a simple WAV-file (mono, 16-bit, 44.1 kHz only) and made sure I could play that. I knew that I eventually would want the mixer to run on its own thread, but I started with just running everything on the main thread to make things simpler.
In short, I make the simplest possible thing work first. Once I have something working, I start iterating over it and add more features — stereo support, more WAV formats, threading, etc.
Even now, there are still a lot of improvements that I could make to the system — there always is (and I’ll talk some more about them later). But since I always keep everything in a workable state, the system can be used as-is and any further improvements can be left to a future quality pass.
Picking a sound backend
Since we are going to do all the sound sampling and mixing ourselves in software, the only thing we need from the system is a way to output our final mixed results to the speakers.
You would think that this would a pretty easy and straightforward task — you have some data and you want to send it to the speakers — but unfortunately, it’s not. It’s almost like it’s too low-level and the system APIs don’t want to make it easy for you.
Windows offers a bewildering jungle of sound systems: waveOut, DirectSound, KMixer, Kernel Streaming, WASAPI, XAudio2, etc. Many of these are considered “legacy” and “deprecated”, though they still work perfectly fine. It’s not easy to suss out which one you should use.
Dennis Gustafsson did a rundown of the options in an old blog post of his: http://blog.tuxedolabs.com/2013/06/26/low-level-audio.html
In short — DirectSound and XAudio2 are too high level and include a bunch of stuff that we don’t really need. KMixer and Kernel Streaming are both deprecated and complicated, which is a bad combination.
That leaves WASAPI and waveOut. Of these two, waveOut seems to be significantly simpler and in accordance with my philosophy of doing the simplest thing first, I started with implementing a waveOut backend. waveOut is pretty old and supposedly “deprecated”, but still works fine (a testament to Microsoft’s commitment to backward compatibility).
From what I can tell, the main advantage of switching to WASAPI over waveOut would be lower latency. It’s unclear to me whether this is because of latency in the waveOut system itself or if it’s just that waveOut needs bigger buffers to avoid starvation — I’ll talk more about that later. I’ll probably add a WASAPI backend in the near future to take advantage of this.
Interestingly, after I investigated this I noticed that the Chromium project seems to have come to the same conclusion. Chromium has two sound backends for Windows: waveout_output_win.cc which uses wave out and audio_low_latency_output_win.cc which uses WASAPI. These source files are a great reference for sound backend implementations.
Using waveOut
Using waveOut is pretty straightforward. You use waveOutOpen() to create a HWAVEOUT handle and
then you write buffer samples to that handle using waveOutWrite().
When you call waveOutOpen() you can specify which output device to use (if you have more than one
sound card). You can also use the constant WAVE_MAPPER to play on the user’s default device, which
is usually preferable. You specify the sample rate and the number of bits you want to use for the
output using a WAVEFORMATEX structure. (This is the same structure used to specify the format of
WAV files, so if you’ve worked with those, it should be familiar.) If you specify a sample rate or
bit rate not supported by your output device, WAVE_MAPPER will automatically convert the data for
you. I use 16-bit and 44.1 kHz (CD quality).
If you read the documentation for waveOutOpen(), it only talks about stereo devices, but, somewhat
surprisingly, waveOut can be used to play surround sound too. To do that, you pass it a
WAVEFORMATEXTENSIBLE struct instead of WAVEFORMATEX — the same way that surround sound is
specified in a WAV file.
Here is how I set it up to for an arbitrary number of channels:
const uint32_t bits_per_sample = 16;
const uint32_t frequency = 44100;
const WAVEFORMATEX format = {
    .wFormatTag = WAVE_FORMAT_EXTENSIBLE,
    .nChannels = (WORD)num_channels,
    .nSamplesPerSec = frequency,
    .nAvgBytesPerSec = frequency * num_channels * bits_per_sample / 8,
    .nBlockAlign = (WORD)(num_channels * bits_per_sample / 8),
    .wBitsPerSample = (WORD)bits_per_sample,
    .cbSize = sizeof(WAVEFORMATEXTENSIBLE) - sizeof(WAVEFORMATEX),
};
GUID subformat_guid;
memcpy(&subformat_guid, SUBTYPE_PCM, sizeof(subformat_guid));
const WAVEFORMATEXTENSIBLE format_ex = {
    .Format = format,
    .Samples.wValidBitsPerSample = (WORD)bits_per_sample,
    .dwChannelMask = channel_mask,
    .SubFormat = KSDATAFORMAT_SUBTYPE_PCM,
};
MMRESULT res = waveOutOpen(&sound_backend->waveout, WAVE_MAPPER, &format_ex.Format, (DWORD_PTR)sound_backend->event, 0, CALLBACK_EVENT);
Here, num_channels is the number of channels and channel_mask is a bitmask specifying which
speakers those channels represent. This is important because just num_channels alone doesn’t give
us enough information about the speaker setup. For example, num_channels = 3 might either refer to
a 2.1 system (LEFT, RIGHT, LFE) or a 3.0 system (LEFT, RIGHT, CENTER). For a description of the bit
fields in the channel_mask, see the WAV file specification. In practice, you are probably unlikely
to encounter any other speaker configurations than stereo, quadraphonic, 5.1 or 7.1 — but it’s still
nice to support other setups.
Given that waveOut can output surround sound, you would think that it also had an interface for
querying whether the user has a surround sound setup or not. But as far as I can tell, it does
not. If you call waveOutGetDevCaps() it always returns the number of channels as 2, even on
surround sound systems. Presumably, this is for backward compatibility reasons. waveOut originally
only had stereo support and surround was added later. There is still old software around that calls
waveOutGetDevCaps()and wouldn’t know what to do if it returned >2 channels. Supposedly, Microsoft
could have fixed this with a waveOutGetDevCapsEx() function. But I guess, since waveOut is
considered “legacy”, they didn’t bother.
Note that in contrast, extending waveOutOpen() to support surround sound does not cause any
backward compatibility problems, because old software will never call it with >2 channels.
Oh, by the way, another thing I tried was to call waveOutOpen() asking for 5.1 channels on a
stereo system, hoping that it would give me an error message. If it had, I would have been able to
determine the user’s setup by just trying 7.1, 5.1, quadraphonic, etc and seeing what worked.
Unfortunately, waveOutOpen() seems to succeed even when I ask for more channels than what is
physically available. I guess in this case it will just downmix internally.
In the end, I couldn’t find any way to check for surround sound setups using the waveOut interface, so I had to go to CoreAudio/WASAPI for that. It’s not too complicated, but I can’t say I’m a fan of this style of programming:
static uint32_t private__get_channel_mask()
{
    uint32_t channel_mask = TM_SPEAKERS__STEREO;
    HRESULT hr = 0;
    hr = CoInitializeEx(NULL, COINIT_MULTITHREADED);
    IMMDeviceEnumerator *enumerator = 0;
    IMMDevice *endpoint = 0;
    IPropertyStore *props = 0;
    PROPVARIANT physical_speakers = { 0 };
    hr = CoCreateInstance(&tm_CLSID_MMDeviceEnumerator, NULL, CLSCTX_ALL, &tm_IID_IMMDeviceEnumerator, (void **)&enumerator);
    EXIT_ON_ERROR(hr);
    hr = enumerator->lpVtbl->GetDefaultAudioEndpoint(enumerator, eRender, eConsole, &endpoint);
    EXIT_ON_ERROR(hr);
    hr = endpoint->lpVtbl->OpenPropertyStore(endpoint, STGM_READ, &props);
    EXIT_ON_ERROR(hr);
    hr = props->lpVtbl->GetValue(props, &tm_PKEY_AudioEndpoint_PhysicalSpeakers, &physical_speakers);
    EXIT_ON_ERROR(hr);

exit:
    SAFE_RELEASE(props);
    SAFE_RELEASE(endpoint);
    SAFE_RELEASE(enumerator);
    CoUninitialize();
    return channel_mask;
}
You feed samples to the waveOut backend using waveOutWrite(). waveOutWrite() essentially takes a
buffer, which should use the same sample rate and bit depth as we specified to waveOutOpen(). The
sample data for the different channels is interleaved, same as in WAV files.
The only annoying thing is that it’s not enough to just call waveOutWrite(), we first have to call
waveOutPrepareHeader() to “prepare” the data and then when the sound is done playing, we need to
call waveOutUnprepareHeader() to “unprepare” the data. I’m not sure exactly what these functions
do or why this is needed. Seems like it would have been a lot simpler if waveOutWrite() just took
care of “preparing” and “unpreparing” the data too.
Calling waveOutPrepareHeader() is not too bad — we can just do that just before the call to
waveOutWrite(), but waveOutUnprepareHeader() is a different beast. We can only call that once
waveOut is done with playing the data, but how are we supposed to know when that happens?
We could try to use waveOuts synchronization mechanism (in our case, an event), but it gets kind
of hairy, so I decided to do something much simpler. I store all the buffer headers that I queue to
the backend in a ring buffer and when the ring buffer has enough entries that it starts to wrap
around, I just call waveOutUnprepareHeader() on the previous entry before storing a new entry in
that slot. Since I will never queue more than a few buffers at a time (that would create horrible
sound latency) I can use a small fixed-size ring buffer to hold the headers.
I use the same technique for storing the actual playback buffer data as this data must be kept alive while the sound playing. I simply use a fixed size ring buffer — big enough to hold all the buffer data I may possibly want to queue ahead — and store the data there.
Feeding the beast
If waveOut ever runs out of data to play, the sound will abruptly stop, which is a horrible user experience, so we must be super careful about feeding this beast. If we have sent a buffer that contains enough data for 10 ms of play, we must send a new buffer with more data within those 10 ms or waveOut will run dry.
At the same time, we can’t send more data than waveOut uses. Suppose that every 10 ms, we send waveOut 20 ms of sound data. That would mean that we would build up a longer and longer queue of sounds to play and the sound latency would get worse and worse. I.e., if you fire a gun, but have already queued up 5 seconds of other sounds to play, it will take 5 seconds before you hear that gun getting fired.
So we need some form of synchronization between the backend and the mixer, to make sure we feed waveOut the right amount of data at the right time.
The main mechanism I use for this is waveOutGetPosition(). This is a callback function that tells
us how many samples the backend has played. I keep track of how many samples I submit to the backend
and by subtracting waveOutGetPosition() from that number, I know how many samples are remaining in
the queue. By dividing that with the sample rate I can compute how many milliseconds of sound are
remaining.
Suppose that we do the audio rendering on the main thread and that we’re targeting 60 Hz. That means that we can expect a call to the audio mixer every 16.6 ms. If we check the backend and see that we have 3.3 ms of sound remaining, we need to add 13.3 ms of sound to make it to the next update without running out of data.
Of course, adding exactly 13.3 ms of sound data would be very risky. What if the next frame is a little late? In that case, we will run out of data and the sound will stop — disaster.
So how much more should we add to be safe? That depends. If you want to be sure that the sound never stalls you must generate as much sound data as the longest possible frame. If you might drop down to 30 Hz you need to queue 33 ms of data. But is that enough? What if you are unlucky and physics stalls or you have to wait for memory to be paged in from the hard drive or Windows swaps you out. Maybe you need 100 ms to feel safe?
The drawback of queuing a lot of data is that it increases the sound latency. If you queue 100 ms of sound data, all your sounds will be delayed by 100 ms. That’s 6 full frames at 60 Hz which starts to be noticeable.
It can be really tricky to find a value that gives you both acceptable latency and a near-zero chance of sound starvation.
The alternative approach is to use a separate thread for mixing. If this thread gets woken up often enough by the OS, it doesn’t matter if the game is dropping frames. The sound mixing thread will happily chug along in the background, still pushing audio to the speakers. In fact, you might have already seen this happen — when a game freezes up, but the sound keeps playing.
When we use a custom sound mixing thread, what matters is no longer the frame time. It’s the time it takes for the sound mixer thread to get rescheduled by the OS. Unfortunately, OS scheduling can be pretty unpredictable too, so again it’s hard to know how many ms of sound we need to render. To make the scheduling work better I’ve increased the priority of the sound mixing thread and made it wait on the waveOut synchronization event. This way the thread should spend most of its time waiting and whenever the event gets triggered — because the backend has retired another sound buffer — it should be ready to run.
I don’t know any way of determining what is a reasonable amount of sound to queue, other than trying different values to see what seems to work. Currently, I’m queuing about 45 ms of sound ahead. I initially had it at half of that, but when I got a new USB sound card I had to up it to avoid starvation. This is a bit disconcerting as it means the amount of buffering needed depends on the sound card and its drivers. Whatever value works for me might not work for everybody else. 45 ms is also higher than the latency you would get if you were able to consistently hit 30 Hz. So if you are confident that your game can do that, you might be better of just running everything on the main thread.
If you do end up using a background thread, you must take care to synchronize the background thread and the main thread, so that they’re not accessing the same data at the same time. But you also want to minimize locking, to reduce the risk that the OS swaps out your thread and causes starvation. I solved this by double buffering all the data and using a single lock to copy the data between the buffers.
It is possible that switching to a WASAPI backend would allow us to use a much smaller buffer — achieving better latency.
Sampling sound sources
To have some sound samples to mix, we first need to get them from the sound sources. We use a unified interface for this:
typedef uint32_t mixer_sampler_f(const void *ud, double offset, float *buffer,
    uint32_t num_samples, float sample_frequency);
Here, ud is some user data specific to this type of sound source. offset is the time in seconds
where we begin sampling. buffer is a buffer allocated by the mixer that will hold the samples.
num_samples is the number of samples we want and sample_frequency is the rate of sampling. The
timestamp for sample i is t = offset + i/sample_frequency.
While our sound sources will mostly be WAV files, note that this approach works with other kinds of sound sources too, such as tone generators, synthesizers, and procedural sounds.
For WAV-files, if the sample rate of the WAV data doesn’t match our sample frequency (44.1 kHz), we have to resample the data.
Again, keeping with the strategy of doing the simplest possible thing, I decided to use linear
interpolation for the resampling. This means that to find the sample at time t, I find the sample
points before and after t and linearly interpolate between them. This is the same as approximating
the continuous “real” sound curve with straight lines between the sample points:
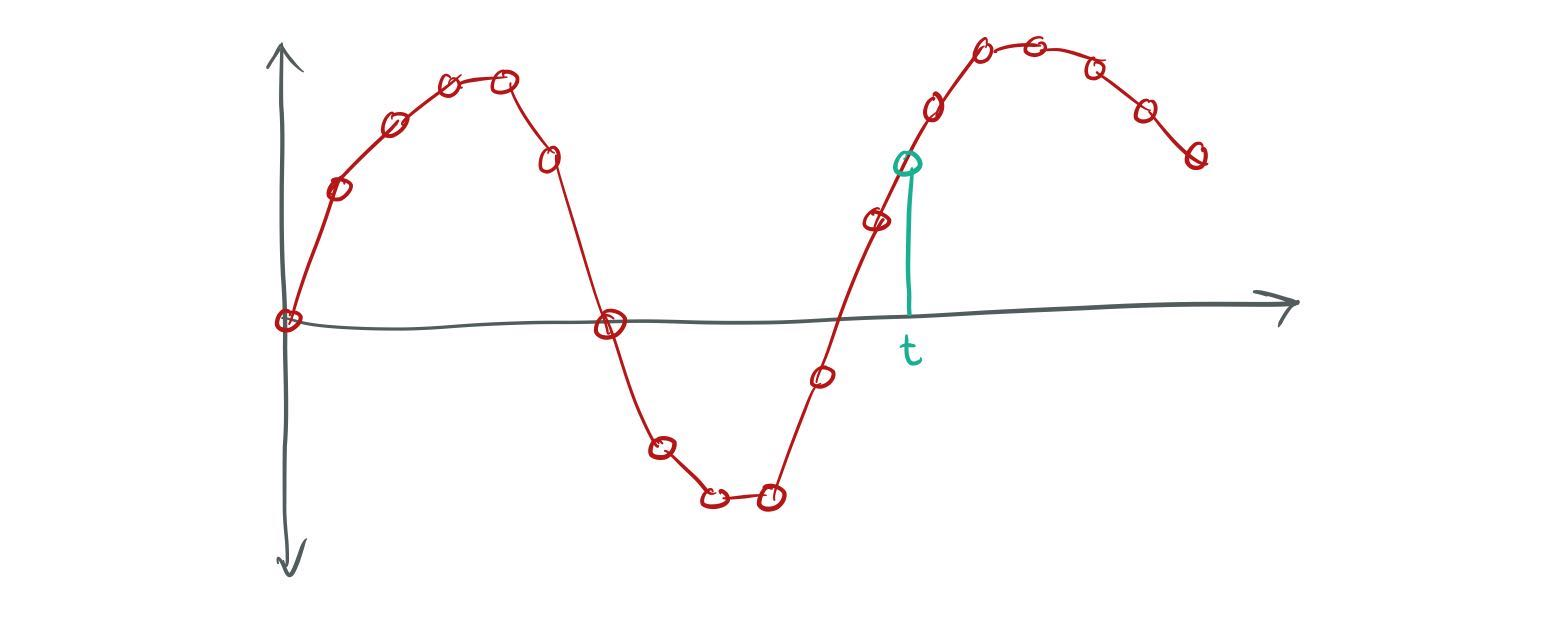
Linear interpolation of a sound wave.
Linear sampling does not necessarily give the best result in terms of faithfully reproducing the “real” sound wave. For example, we know that the real curve is “smooth” and doesn’t have the sharp corners that our approximation does. However, as with all of these things, it is not clear to me exactly how audible the difference is. And to be honest, I don’t have the best ear for these things. In the future, I will probably spend some time investigating alternative interpolation algorithms, such as Hermite interpolation.
An interesting thing to note is that we can support changing the pitch of the sampled sounds by just changing the sampling frequency. For example, if we sample at half of our mixing frequency (22.05 kHz) the time step between each of our samples will be twice as big, so the WAV file will play at twice the speed and one octave higher. So it’s easy for us to add an option for the user to control the pitch of the sound.
Mixing
Once we have sampled all our sound sources, the next step is mixing. For each sound source, we have
a matrix m[input_channel][output_channel] that describes how much each input channel of that
sound source should contribute to each of our output channels. (More about how we calculate that
matrix later.)
To compute the output for each speaker, we simply add together the contributions of every sound source:
for each sound source s:
for each input channel ic in s:
for each output channel oc:
for i = 0 … num_samples
output[oc][i] = output[oc][i] + s.sample[ic][i] * m[ic][oc]
Here, num_samples is the total number of samples that we’re rendering.
If we naively write the C code for the inner loop, it might look something like this:
void mul_add(float *res, const float *a, const float *b,
        float m, uint32_t num_samples)
{
    for (uint32_t i=0; i<num_samples; ++i)
        res[i] = a[i] + b[i] * m;
}
And we would call it like this:
mul_add(output[oc], output[oc], s.sample[ic], m[ic][oc]);
However, as this is an inner loop that will be called a lot — twice for each sample of each playing sound (with mono sources and stereo output) — it makes sense to try to optimize it. There are three important improvements we can do:
-
We can use AVX. That allows us to process 8 floating-point operations at a time. (If AVX is not available, we could use SSE.)
-
AVX has a “fused multiply and add” instruction that performs the whole
a + b * mcomputation as a single instruction. -
We can add
restrictto theres,aandbpointers so that the compiler can generate more efficient code.
The last point is a bit subtle and perhaps warrants a more detailed explanation. The way mul_add()
is written now, the compiler cannot assume that the res, a and b pointers are unrelated. I.e.,
what the compiler writes to res could affect what it sees when it reads a. For example, we could
call mul_add() like this:
mul_add(p + 1, p, s, m);
With this setup res + i == a + i + 1, so whatever we write to res[i] will be the next value read
from a[i]. In situations like this, the compiler has to be very careful with how it does its loads
and stores. It can’t, for example, read a[i+1] from memory into a register before it has written
out res[i], because those could be the same memory locations.
By using the restrict keyword we tell the compiler that res, a and b are all independent
memory locations and what is written to one cannot affect what is being read from the other. This
gives the compiler more freedom in rearranging its loads and stores.
Here’s what the final function looks like:
void mul_add(float * restrict res,
    const float * restrict a, const float * restrict b,
    float m, uint32_t num_samples)
{
    __m256 v_m = _mm256_broadcast_ss(&m);
    for (i = 0; i < num_samples; i += 8) {
        __m256 v_a = _mm256_load_ps(a + i);
        __m256 v_b = _mm256_load_ps(b + i);
        __m256 v_res = _mm256_fmadd_ps(v_b, v_amplitude, v_a);
        _mm256_store_ps(res + i, v_res);
    }
}
But note that this means that we can no longer call the function like this:
mul_add(output[oc], output[oc], s.sample[ic], m[ic][oc]);
With the restrict keyword, we promised that res and a would be independent, but we just passed
in the same pointer for both res and a.
We can solve this by double buffering the output. We can allocate two separate buffers. One to read
from (output_read) and one to write to (output_write). Then, after each call to mul_add(), we
swap the two buffers, so that the last buffer written to, now becomes the buffer to read from:
mul_add(output_write[oc], output_read[oc], s.sample[ic], m[ic][oc]);
swap(output_write[oc], output_read[oc]);
I run the mixer on a dedicated sound rendering thread. The thread always generates the same number
of samples (I call this the RENDER_QUANTUM) and uses the backend event and remaining_samples()
to determine if it needs to render more samples:
while (true)
{
    if (backend->remaining_samples() > 3 * RENDER_QUANTUM / 2) {
        tm_sound_backend_api->wait(0.1f);
        continue;
    }
    samples_t samples = render(mixer, RENDER_QUANTUM, channel_mask);
    backend->feed(samples);
}
Basically, if the backend has more than 1.5 x RENDER_QUANTUM of samples we consider that it has
“enough” and wait for the event to signal that one of the RENDER_QUANTUM sized buffers has been
processed before proceeding.
As discussed above, RENDER_QUANTUM needs to be set high enough that the sound backend doesn’t
starve, but otherwise as low as possible so that we minimize sound latency. I found a value around
2048, or 46.4 ms seems to work for me on waveOut.
But we don’t actually want to use 2048 as our RENDER_QUANTUM.
Why? This is another subtle issue that has to do with how we allocate buffers. We use a single big
VM allocation for all the sound
memory and then allocate buffers from it by simple pointer bumping. The size of a buffer is
RENDER_QUANTUM * sizeof(float) so if one buffer is at p, the next buffer will be at p + 8192.
The problem with this is that it will lead to cache line
collisions.
Caches typically have sizes that are powers of two, so there is a high risk that p and p + 8192
will map to the exact same cache line. This means that in our inner loop function above, res, a
and b will all end up on the same cache line and so will res[i], a[i] and b[i]. With all
these values mapped to the same cache line, they can’t be in the cache simultaneously which is bad.
There are multiple ways you could avoid this. You could bump the pointer a little bit between each
buffer allocation to make sure they’re not on the same cache line, or you can choose a
RENDER_QUANTUM that’s not a power of 2. I choose the latter option and set enum { RENDER_QUANTUM= 257 * 8 }. Note that the render quantum still needs to be a multiple of 8, because we want our
floats to be aligned for AVX.
Note that I haven’t actually tested all these optimizations to see what kind of an improvement they make. That would be an interesting experiment.
Snap, crackle, and pop
In addition to sound starvation, there are a few other situations that can give you audible sound artifacts. One is changing the sound volume. If you change the volume (amplitude) of a sound wave from one same to the next you will create a discontinuity in the sound wave:
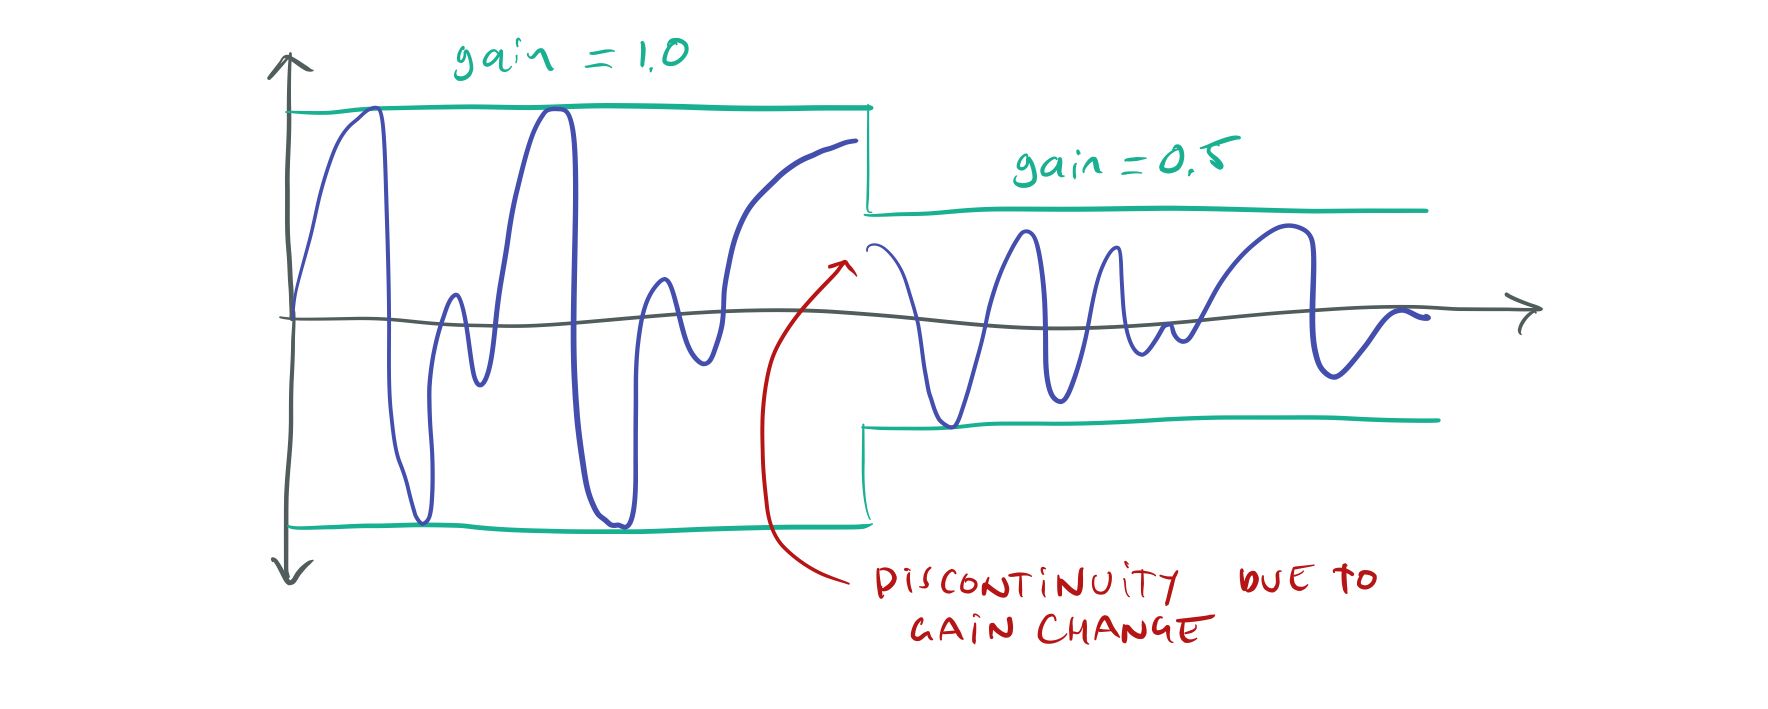
Instant volume changes cause discontinuities.
It might not be immediately obvious, but discontinuities like this in the sound wave lead to audible snaps, crackles, and pops in the sound. To get rid of the crackles we have to change the volume slowly, over a number of samples instead of doing it instantly:
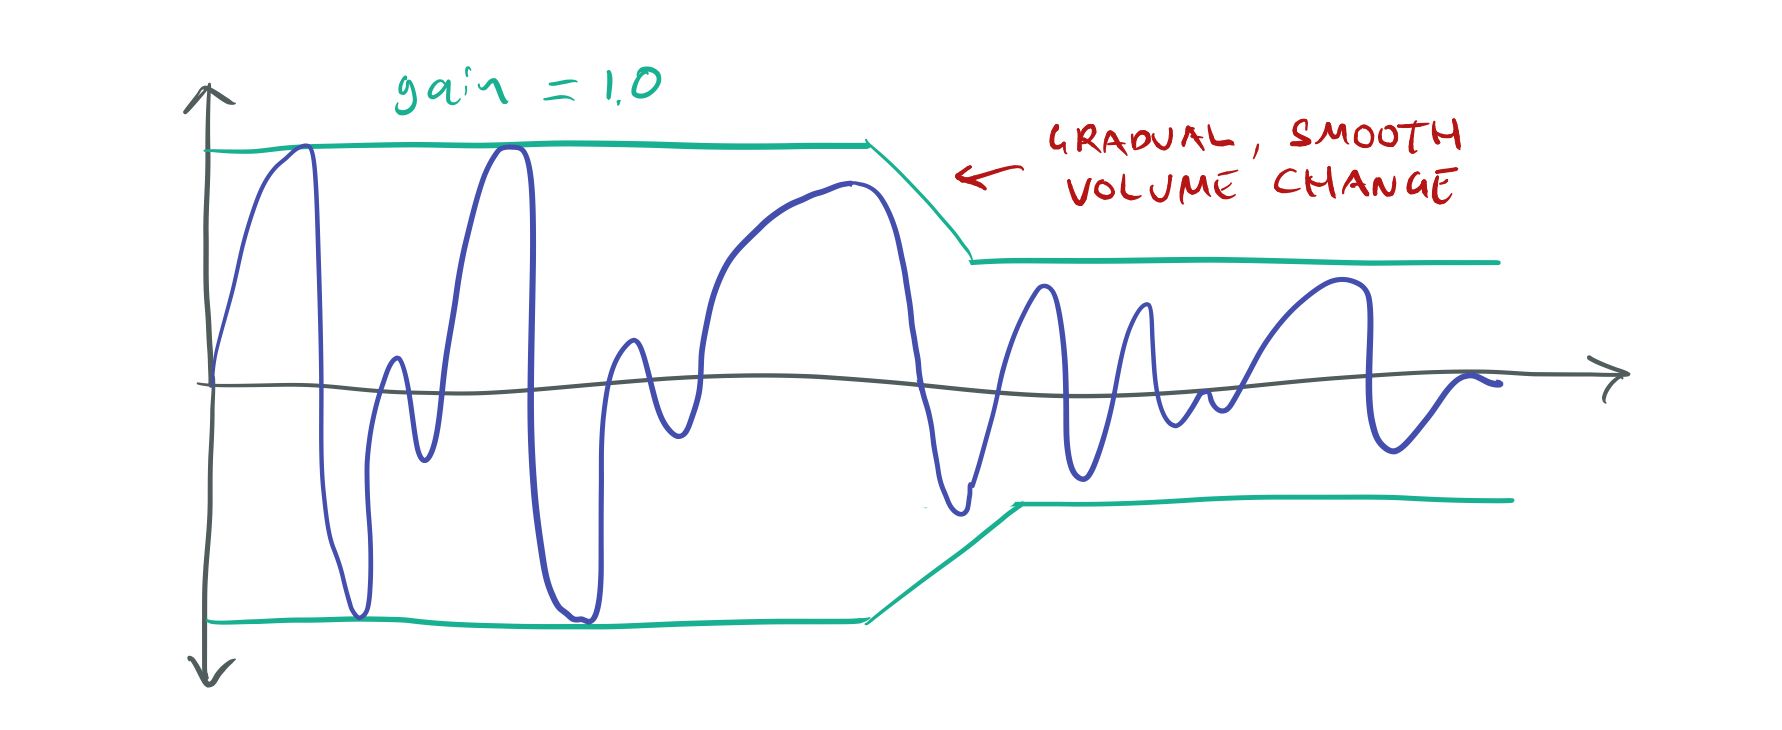
If we change the volume gradually, continuity is preserved.
In my tests, to completely get rid of clicks and pops I could only change the gain by 1/3072th per 44.1 kHz sample. This is equivalent to a full gain change 0 → 1 in 70 ms. It probably would be possible to change the gain faster by doing it non-linearly, i.e. make small changes when the gain is close to 0 and bigger changes when the volume is close to 1, but I haven’t investigated this in any great detail.
One important thing to note is that it is not just changing the volume of a sound that can cause these artifacts. Anything that affects the gain of a sound can cause popping and clicking.
For example, suppose that a sound is positioned in the 3D world and that the user turns her head quickly so that the sound moves from her left ear to her right ear over the cause of a frame. This means that the gain of the sound in the left speaker goes from 0 → 1 and the gain in the right speaker goes from 1 → 0, causing the same sound artifacts as if the volume of the sound had been changed directly.
I handle all these gain changes in a uniform way by applying the ramping, not to individual volume
and position changes, but to the whole gain matrix m[ic][oc] that describes the gain from each
of the sound’s input channels to each output speaker channel.
Pops can also happen if we stop a sound while it’s in the middle of playing, since stopping a sound
is equivalent to a 0 → 1 gain change. To make sure that a sound stops smoothly we can’t just stop it
immediately, instead, we have to set a target gain matrix of m = {0} and then ramp towards this
value. Once all matrix entries have reached zero it is safe to stop the sound.
Another problem that can occur is clipping. If we add together five sounds, each in the [-1, 1] range we end up with a buffer in the [-5, 5] range. But there is no way for our speaker to play that! Our speaker cone has a maximum range of [-1, 1]. The best we can do is to clamp all values > 5 to 1 and all values < -5 to -1. This process is called clipping and it will lead to sound artifacts, though not as bad as the clicking and popping artifacts.
One way of handling this is to avoid playing sounds at full volume to leave some headroom for adding sounds together. For example, if we keep each of our sounds are in the [-0.2, 0.2] range, when we add them together we can never go outside the [-1, 1] range.
However, there is a limit to how far you can take this. If you want to be able to have hundreds of sounds playing, you would have to clamp each one to 0.01 to absolutely avoid overflow, but at that gain, they’ll be barely audible. It’s better to allow each individual sound to be louder and have a strategy for dealing with overflows.
The problem is similar to that of tone-mapping in physically-based (HDR) rendering. We’re trying to map a potentially infinite range of physical energy values (in the case of HDR — the amount of lighting, for sound — air pressure) to the limited range of an output device (in the case of HDR — the screen, for sound — the speaker).
So to fix it, we can employ a similar solution. Exactly how we do that depends on what we want to achieve. Do we want the loud sounds to “drown out” the quieter sounds so that they become inaudible. In that case, we can just scale all the volumes down until we’re back in the [-1, 1] range. Or do we want the quieter sounds to still be audible? In that case, we have to apply some kind of dynamic range compression — making the louder sounds quieter without affecting the quieter sounds.
I decided to go with the first option since again, it was the simpler one. I’m not sure exactly what is “right” here. I think it’s partly a matter of psychoacoustics and partly an artistic choice. For example, another option might be to apply a filter to make everything sound muffled, after the player has been “deafened” by a particularly loud sound. Ambitious games may decide to implement their own tone-mapping model
3D Positioning
The mixer performs 3D positioning of sounds. It does this by considering the position of the sound
source in the virtual world and the position of the “listener” (player). From this, it computes how
much of each sound should be sent to each output channel — our matrix m[ic][oc]. For example, if
the sound is to the right of the player, we play it with higher volume in the right speaker and
lower volume in the left speaker.
3D positioning is actually two pretty distinct problems depending on whether the player is using headphones or speakers.
In the real world, humans use multiple cues to locate the direction that a sound is coming from:
- The volume of the sound that is heard by each ear.
- When, in time, the sound arrives at each ear.
- How the sound is affected by the head and the shape of the outer ears.
The last point is called the head-related transfer formula (HRTF) and it affects different frequencies of the sound differently, depending on the direction. Actually, each one of us has a slightly different HRTF, since the shape of our heads and ears differ, but it can be pretty decently approximated by an “average” head.
The difference between using speakers and headphones is that when we are using headphones we are delivering the sound straight into the player’s inner ears, bypassing the head and the outer ears. So to give the user accurate position cues, we should compute the HRTF and the sound delays and apply them before we send the output data to the headphones.
In contrast, when we’re playing sounds through the speakers, the sound will be modulated by the player’s head and outer ears before reaching the inner ears. So in this case, the engine should not be applying an HRTF to the sound before playing it. If we did, the HRTF would be applied twice. First, as a “virtual” HRTF in the engine, and then as a physical HRTF in the “real world”.
So playing through speakers and headphones are very different things.
So far, however, I haven’t implemented a true HRTF for The Machinery. For now, I’m just using simple gain based positioning, which ends up being the same for speakers and headphones.
To compute the gain for each channel, I compute the angle from the listener to the sound and compare that with the angle to each speaker. I find the two speakers that the sound is closest to and fade between them. Then we multiply that with a distance-based attenuation model:
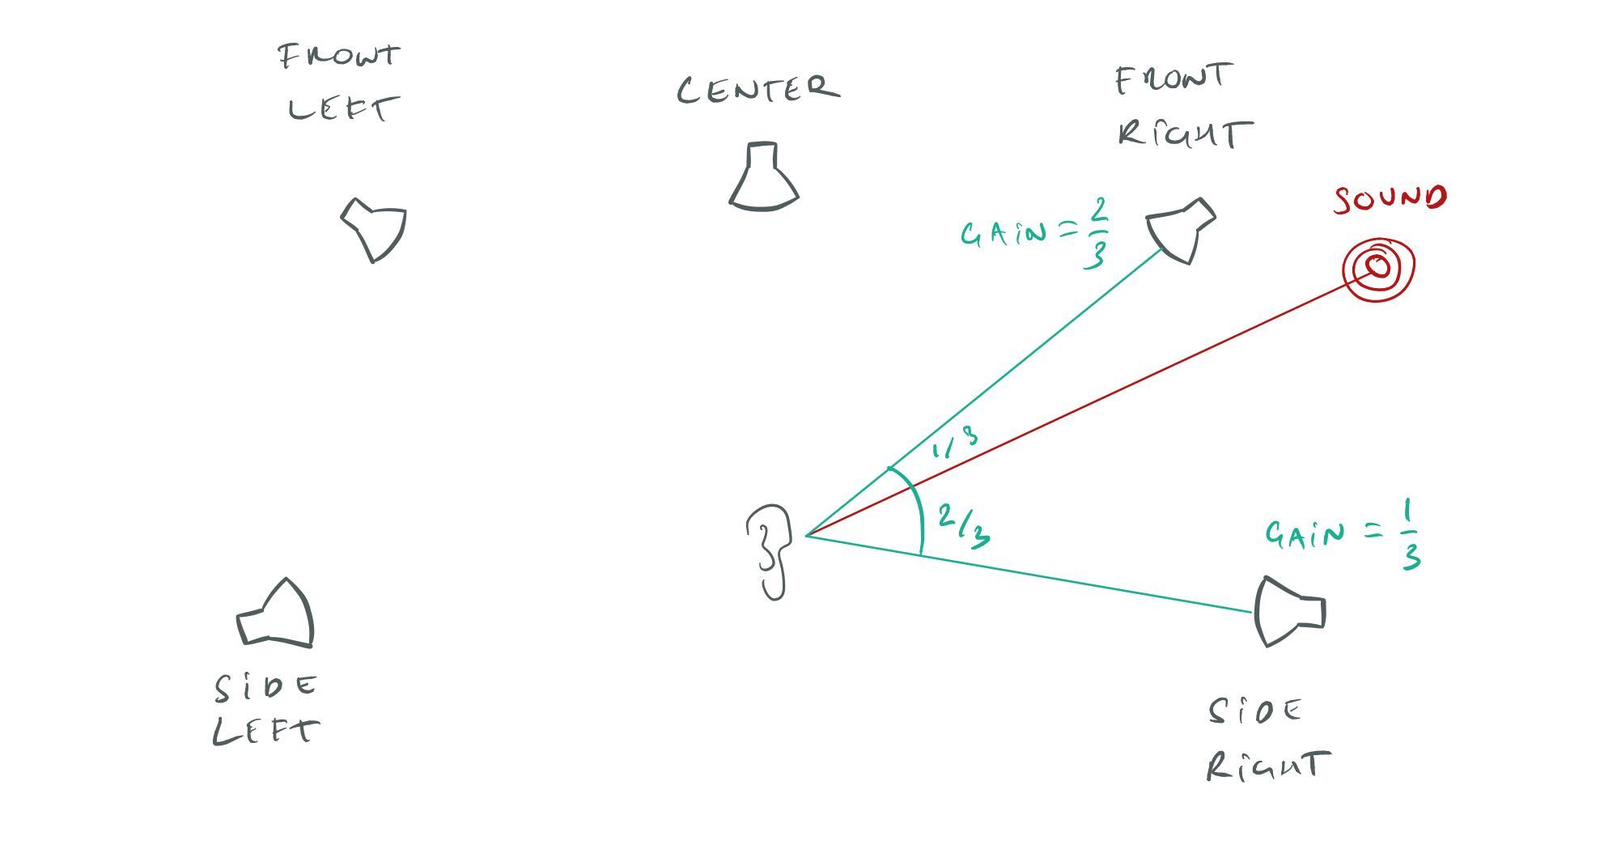
Positioning a 3D sound onto a speaker setup.
Of course, I don’t know the actual angles to the speakers, since that depends on where the user has positioned them in their living room — information that I’m not privy too. Instead, I use standard angles defined for Dolby 5.1 and 7.1 setups.
Note too that I’m performing the calculation in 2D. If the user has, for example, a 7.1.4 setup,
there will be TOP speakers that are elevated. I.e. in addition to the planar angle to the sound
and the speakers we also have to take into account the azimuth angle and perform the blend in 3D.
Currently, though, we don’t support 7.1.4 speaker configurations.
There is a common problem with 3D positioning that happens when sounds are treated as point sources. If the player gets very close to a point sound source, it will jump quickly between the left and right ear based on very small player movements. This tends to sound very unnatural, because “real world” sounds aren’t point sources, our head is not a “point listener” and we can’t put our head straight through a sound source anyway.
We address this by giving sound sources a spread parameter that essentially specifies the “size”
of the sound source. When the user is inside the spread distance, we play the sound as an
unpositioned sound — equal volume on all channels. As the user moves away from the spread distance,
we blend between this unpositioned sound and a 3D positioned sound computed using the calculations
above. Note that we can perform this blend simply by blending the coefficients of m[ic][oc].
Incidentally, this also gives us a way to position multichannel sounds, such as stereo or 5.1
recordings. This is normally tricky because if we position such a sound as a point source, all the
channels downmix to mono since they’re all coming from the same position in space. This means that
the “expanse” of the sound is lost. However, if we just apply the spread algorithm from above,
everything works nicely. We use the spread to blend between an unpositioned sound (plays as a normal
stereo or 5.1 sound) and a 3D positioned sound (plays as a mono point source). When the player is
within the spread distance she will hear a normal stereo recording, but as she moves out of it, it
will smoothly transition to a positioned source with directionality.
Future features
As you can see, we’ve only just gotten started with our sound system. In addition to the stuff already mentioned in this post there is a lot of other stuff missing that we would like to add in the future:
- Reverb.
- Other DSP effects.
- React dynamically to changes in the speaker set up (plug headphones in/out).
- Streaming support.
- Support for compressed formats: ADPCM, Vorbis, MP3, M4A.
- Directional sound sources.
- Doppler effects.
- High-level sound features
- Randomization
- Looping ranges
- Sequences
But with our ship-early, ship-often strategy we already have a functional sound system that is “good enough” for many games and other applications.